Got my Brew Built IceMaster Max 2 dual vessel glycol chiller (with built-in temp controllers and pumps) in from morebeer.com today. First thing I did (after checking that pumps all worked and the chiller worked and no leaks) was to begin diving into tearing it apart. The plan was to wire in switched outlets for 120v heater pads when the controller needed heating. I didn't want to permanently modify heaters and peripherals, so just went with switched 120v outlets mounted in the back top.
The chiller is smaller than the IceMaster 4 or the Blichmann (shown below on the right next to it and a half bbl SS Brewtech BME chronicle for size) and only takes 5 gallons of cooling fluid (recommended at a 4:1 ratio water to glycol).
Unfortunately, the controllers are all fixed in the metric system, so I have to learn to think in Celsius (no option to switch to Fahrenheit ... until I get this $15 Inkbird ITC-1000 replacement). So I took the opportunity to label maker some common temps I will want to hit. Both on the chiller controller side (first image below), and on each fermentation vessel controller (next image). Once I get the new dual relay with Fahrenheit, I can wire in a 300W fish tank heater in the glycol to maintain an exact temp (not just cool).
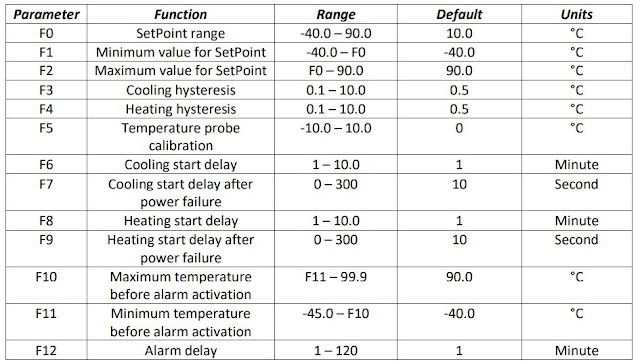
I'm posting the vessel controller menu page, since it isn't included in the instructions. You enter the settings by holding UP/DN buttons at same time for 3 seconds, then up/dn to move through the F* menus and then press up+dn to enter. To simply change setpoint, hold UP button for 3 seconds. Hold DN button for 3 seconds to power off.
Be careful following the instructions for Kegland's G20 that some have posted online, as the schematic (shown below) is for a 240v system, and it looks like for the US 120v version, they have gone with a 12v AC-DC power supply that runs the controller and they do NOT pipe the raw 120v onto the controller board. That means that the pump motors are also 12v (probably work with my SS Brewtech pump). Originally, I had planned to just bridge over from the 120v relay control according to the schematic to have a full 120v switched heating outlet, but some quick tests proved that wasn't going to work.
Found the spades on the back of the two vessel temp controllers and verified that they do relay switch on when the temp was indicating it needed heating and the little "heat" light was on the display. So, I just routed the hot side 120v from the main switch (brown wire on mine) through the relay and ran a dedicated neutral (blue wire on mine) to an outlet with the bus bar broken for separate power on each socket. This allows the controllers to be able to power a 120v grow mat or heater.
This allowed me to move onto the next step, which was to find a suitable place to cut in an outlet. I ultimately picked the top of the unit at the sealed back side, since I didn't want to risk touching 120v with the lid up or while filling water. I pulled dedicated neutral from the switch and routed homerun from the hot leg to the relay of each controller and back to the respective switch socket (I broke the bus bar tying the two together to allow each to operate independently). I also took the opportunity of running case ground to the AC/DC power supply as well as to the outlet.
I will tell you that I'm a bit concerned with the fairly light wire used to run from the plug to the switch and finally to the compressor. I'm not sure what current it draws, but it really is too light, I feel (believe it is 16 AWG). Possibly it is fine, since the chiller is rated at 600W, which is 5A, and should be fine. The final buttoned up view is shown below.
The last thing I need to do is put some 2" casters on it. It appears that the rubber feet screw into an M8x1.25mm metric nut, so some cheap ones similar to what are on my fermenter might work if I can find some metric ones...
Update 12/5/2020: I really do not like trying to convert my thinking to Celcius, and the drop-in replacement Inkbird ITC-1000 for the main controller was a simple decision and swap for $15. The secondary controllers that run the pumps, I could not find any direct replacements, but you can do some metal fab work/cutting and the same Inkbird ITC-1000 will fit in and you can then have full control in 'F and I've made this change to mine. I had almost decided to try to live with the 'C display, though it was grating on me to see the "current" fermenter temp and not just "know" what 5.3'C meant. But, as fate would have it, one of the controller's down arrow posts broke off making it useless, so I just made the swap.


Thanks for the idea of swapping out the controllers.
ReplyDelete